
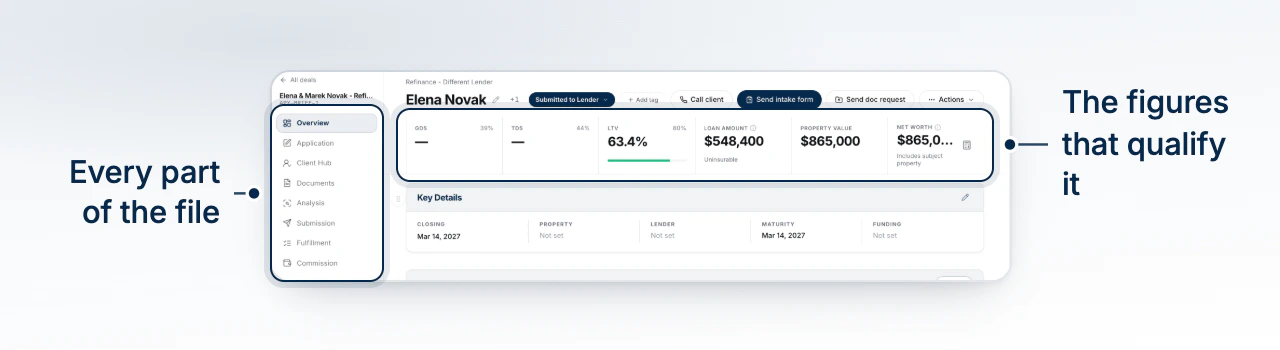
A deal opens into its own workspace: sections down the left, the file's identity across the top, and six qualifying figures pinned above whichever section you are in.
The Sections Down the Side
The rail lists Overview, Application, Documents, AI Analysis, Submission, Fulfillment, and Commission, in the order a file is worked. Documents and Fulfillment carry a count of stored documents and open conditions. All deals at the top takes you back to the book, under the deal's name and its reference number. Commission is absent when your brokerage has not granted you commission visibility on this file.
The Header: Name, Stage, Deadline, and Tags
The heading is the borrower, and selecting it opens their contact; the pencil renames the deal. A +2 style button beside it lists co-applicants. The solid chip is the stage. Selecting it lists the stages of the board this deal is on, and every other board you have set up opens its own stages to the side, so you can move the file along its pipeline or onto a different one without leaving the deal. A deadline chip appears only while the file's nearest hard date is close or past. Tags sit on the same row. On the right are Call client, the way you open the file, and Actions. Until you have reached the client, the two ways to open it sit side by side: Send intake form takes their application, and Send doc request asks them for documents. Once you have done either, both give way to Message client. Call client rings the primary applicant on the number held on their record: if your brokerage has a phone line set up, the call is placed in BrokerPlus and the call bar opens at the bottom of the screen; otherwise the number is handed to whatever your computer uses to make calls. It appears only when that applicant has a phone number on file.
The Six Figures Pinned Above Every Section
GDS, TDS, and LTV each show their limit and take amber near it and red over it; a healthy figure stays in plain ink. Beside them sit Loan amount, Property value, and Net worth. The information icon on Loan amount breaks it into Amount requested plus any default insurance premium, and says why the deal is or is not insured.
A warning mark on GDS or TDS means the figure rests on a carrying cost nobody has entered. A subject property with no annual property tax or no annual heating is serviced as though that cost were zero, so the ratio reads better than the file does. The information icon lists which figures are missing, and each of those fields on the mortgage application says the same thing under it, so you can enter the real number before a lender sees the deal. Condo fees are noted separately: the fee itself is known, and only the share of it counted toward your ratios is our 50% default.
Some lenders qualify without the subject property's carrying costs. Turn off Include expenses in TDS calculations on the subject property in the mortgage application, and its property taxes, heating and condo fees leave both GDS and TDS, so the figures match that lender's. Every other property the borrower owns has the same switch on its row in Properties, which takes that property's whole cost, mortgage payment included, out of TDS. Deals synced from Finmo carry Finmo's setting for each property across in both directions.
Key Details You Can Edit in Place
Overview opens with Closing, Property, Lender, Maturity, Lender Approved, and Lender Submitted. Closing is editable on the spot: select the date and leave the field to save. Lender Submitted is the day the package went to the lender, taken from the submission itself, so it fills in once the deal has been sent. A cell with nothing behind it reads Not set. Once the deal funds, Funded amount and Funded join the strip, and a Client intake cell appears once a client has submitted one, opening what they answered.
What Your Client Still Owes You
Outstanding Client Requests gathers everything the file is waiting on the client for, in one place. It counts four kinds of ask: a condition assigned to the borrower, a signing package sent and not yet signed, an application they have not submitted, and a document you asked for in their hub. It starts folded, and the line beside the title is the whole answer when nothing needs you: Nothing outstanding, or how many have been waiting longer than a week.
Open it and each kind is its own group, headed by what it is and how many there are, because each one is chased differently. Every group links to where you act on it: conditions open the Fulfillment section, and the rest open the client's hub. A group showing only some of its items says how many more are waiting, and that link goes to the same place.
Under each heading, a row gives what was asked for, who owes it, and how long it has sat. An item waiting longer than a week carries an amber chip with the number of days, and the groups are ordered so whatever your client has been quiet on longest comes first. An item leaves on its own as soon as it comes back, so the section empties itself as the file moves.
Custom Fields and Your Overview Order
Custom Fields holds the extra information your brokerage tracks, such as a payroll code or appraisal reimbursement. An admin can choose Add Field for Every Deal or Manage on the record, or open Settings > Custom Fields, to define text, number, date, and dropdown fields grouped into named categories. Definitions apply to every deal in the brokerage; brokers with write access can fill them in but cannot change the catalog.
A text answer is written in a small editor rather than on one line, so it can hold a list: press Enter for a new line, Shift+Enter for a line break within one, and use the bar underneath for bold, italic, underline, and bulleted or numbered lists. It saves when you leave the box. A number or date answer saves when you leave the field or press Enter. Escape discards an unsaved edit. Choosing a dropdown option saves immediately; clearing an answer returns it to Not set. Removing a field or a dropdown option keeps answers already recorded. Restore an archived field using its original name and type, or choose a different name for a new kind of field. Recorded answers are included in the Custom Fields data export.
A field can also carry the answer it starts with. Set Starts with when you add or edit the field, and every deal opened after that begins with it already filled in, which saves retyping a value that is the same on each file. Anyone can change it on their own deal. Deals that already exist keep the answers they have, and editing the value later changes only the deals opened from then on. A dropdown offers its own options here, and a number field accepts a figure, so the starting answer is always one the field itself accepts. Leave it empty for a field that starts blank.
Use the grip beside an overview block to move it. With the keyboard, focus the grip, press Space, move with the arrow keys, and press Space again to place it. Your order follows your account and changes nobody else's overview. Notes and Activity move together.
The Actions Menu
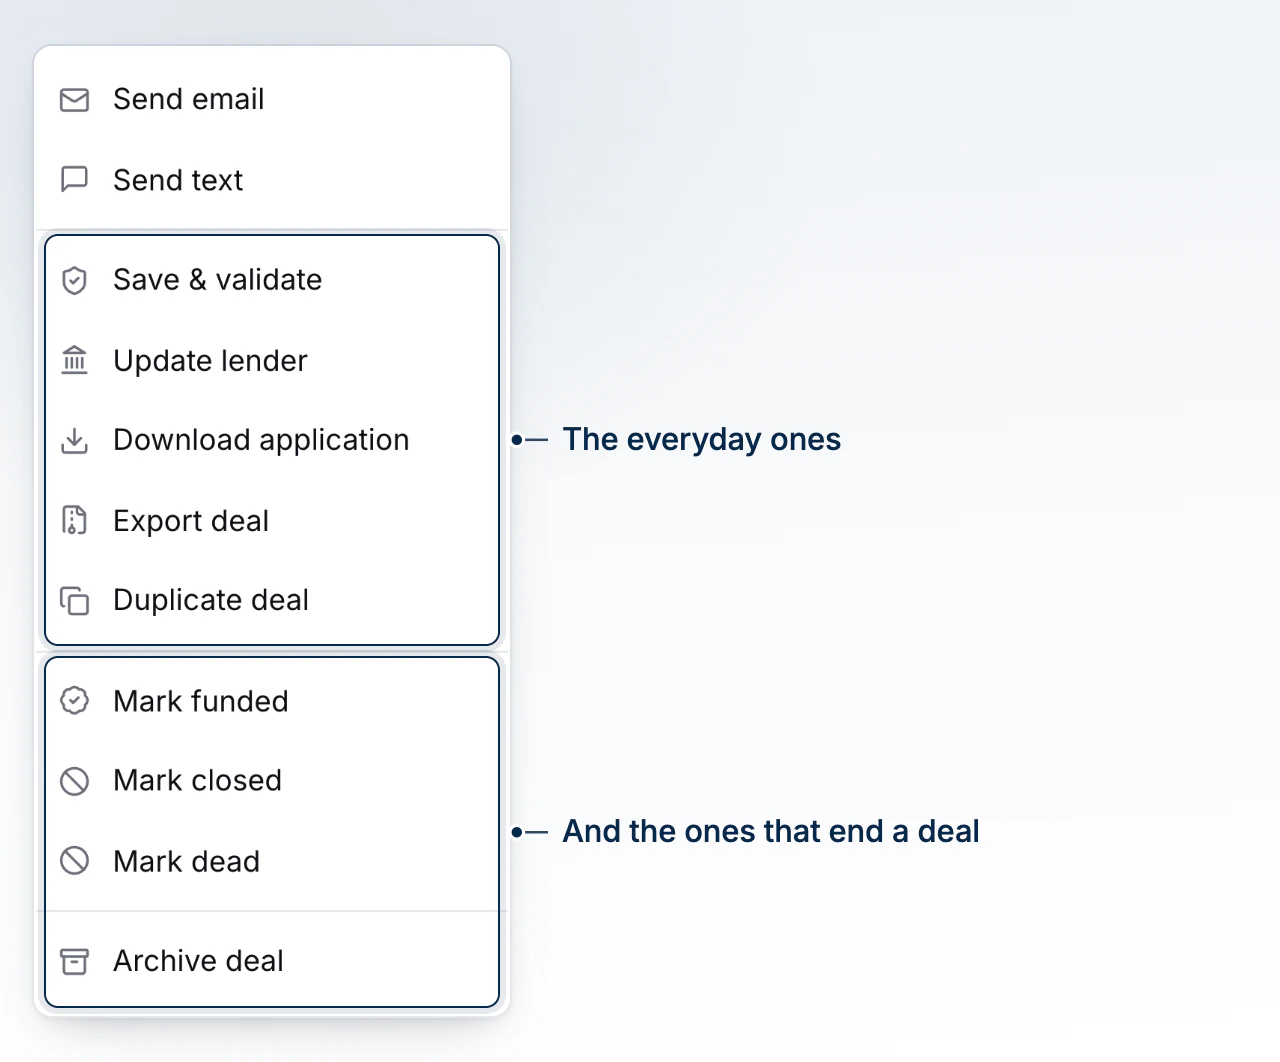
Actions holds Send email, Send text, Save & validate, Update lender, Calculator, Download application, Duplicate deal, and Archive deal. Ending a deal is a named act here: Mark funded, Mark closed, or Mark dead. A dead file offers Reopen deal, which also restores the re-screening it paused.
Copying a Deal
Duplicate deal opens Copy Deal, where you choose what comes across. The same choices appear when you copy from a board card.
Purpose of New Deal sets the goal of the new file. The borrowers, their income, and the property come across whichever purpose you pick, so this is how a client's purchase becomes their refinance without retyping the application.
Changing the purchase to a refinance, renewal, or HELOC leaves behind the answers only a purchase has: how far along the purchase was, the financing condition date, the improvement and deposit figures, and the down payment sources. The modal names the ones your file holds before you create the copy, and the original keeps all of them. The property's value stays, because that is what the new mortgage is measured against. Three switches decide the rest:
- Bring the Other Participants carries co-applicants, guarantors, and partners such as a realtor. Turn it off and the copy starts with the main borrower alone; anyone left behind takes their income, assets, and debts with them.
- Email a Credit Consent Form asks the borrowers on the copy to authorize a credit check. Consent is given per file, so a copy inherits none. If your brokerage uploaded its own consent form under Settings > Client Requests > Client Intake, that document is what the borrowers are sent, as a form they sign; otherwise they get the built-in credit check authorization. Credit authorization is recorded for each borrower on the new file only after they sign. An unreadable uploaded form is not replaced with different wording. If a form cannot be sent, the copy is still made and you can send it again from the Compliance tab.
- Archive the Original Deal takes the deal you copied off your pipeline. You can restore it from the archive at any time.
Choose Create Copy and the new file opens with its own reference number, in the board's first stage. Submissions, funding, documents, conditions, tasks, and compliance records stay on the original.
Dragging a card does not end a deal
Moving a card into a Complete or Not Proceeding column only moves it. Funding, closing compliance, and the anti-money-laundering check run from these menu entries.
The Notes Rail
Every section except Overview carries the deal's notes in a right-hand rail, so you can write one without walking back. It starts collapsed and still shows the note count. Overview renders the same notes in its own grid.
You can also open Notes from a deal card. When a note or its template is long, scroll inside the writing area to read and edit it. The Add Note button stays below the editor, and the saved notes scroll separately.
Suggestions on the File
When your assistant has something to propose about the file, a chip beside the name counts it. Open it to read each one, then Apply the ones you want or Dismiss all.